Needlepainted Flower

After I finished the teal rose, I was still in the stitching mood. I started looking through drawings online and ones saved on Pinterest and on my computer, including some tattoo designs I’ve been saving for ideas for future tattoos.

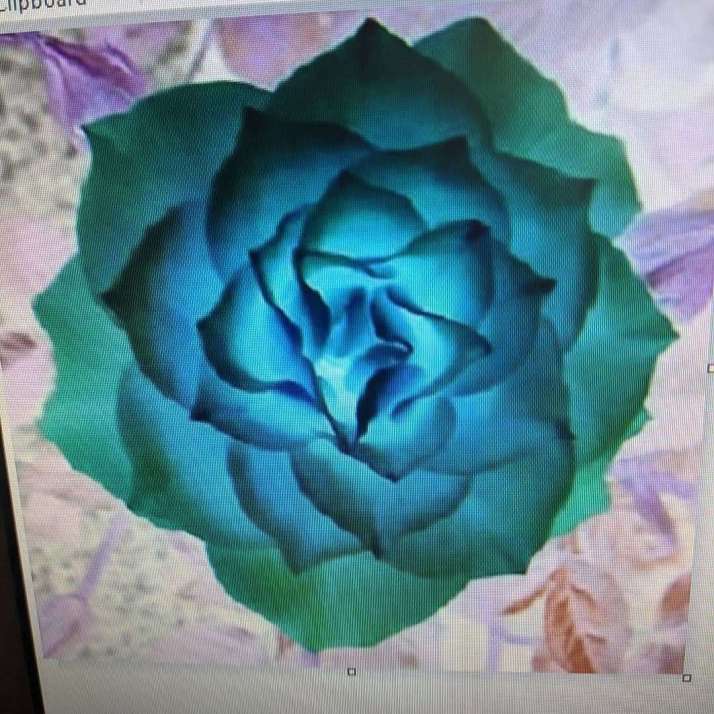
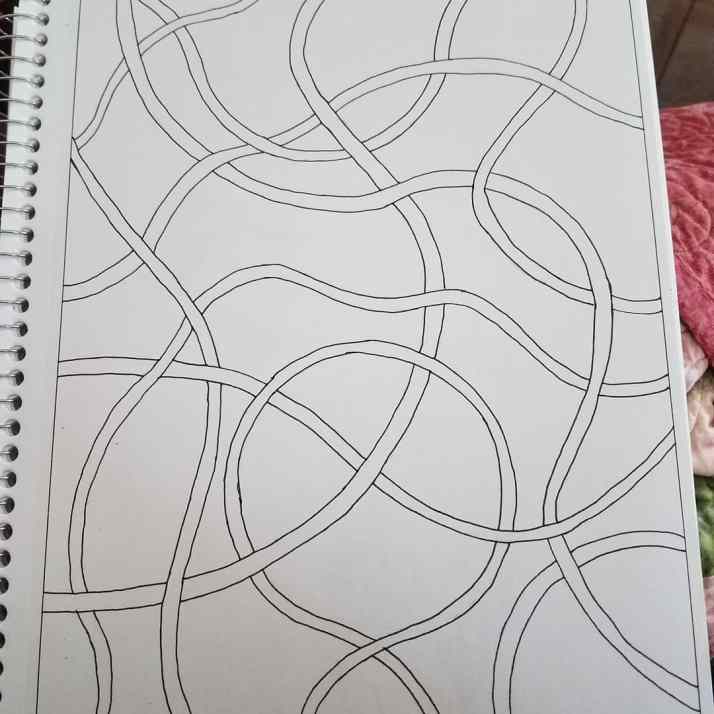
This one has really caught my eye a lot of times:

IMG_20200726_215641

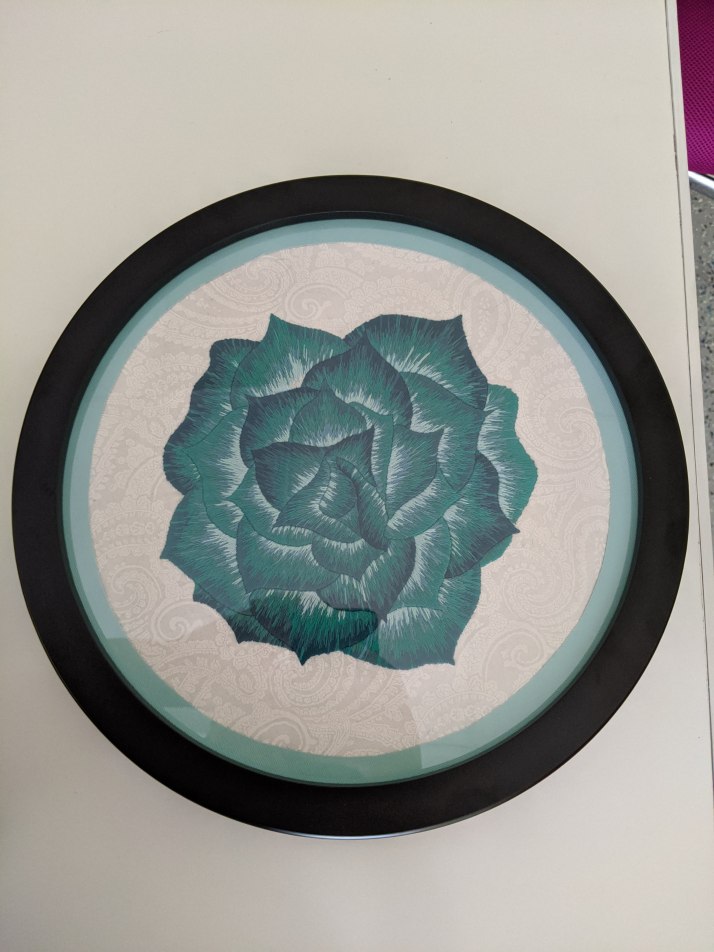
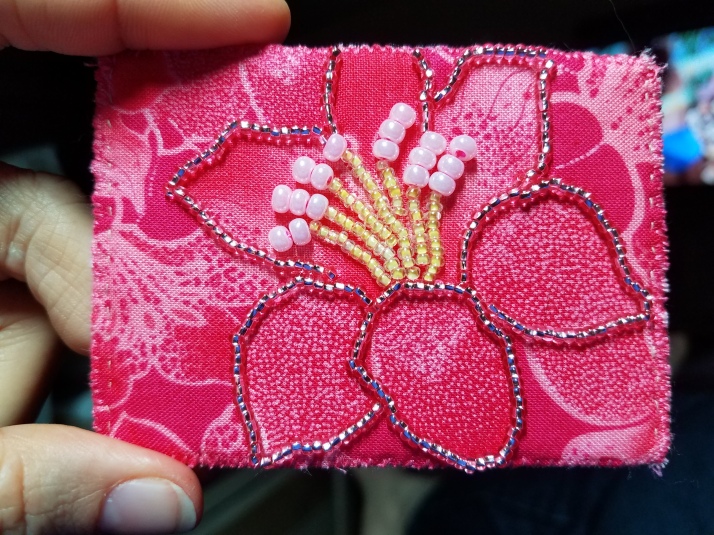
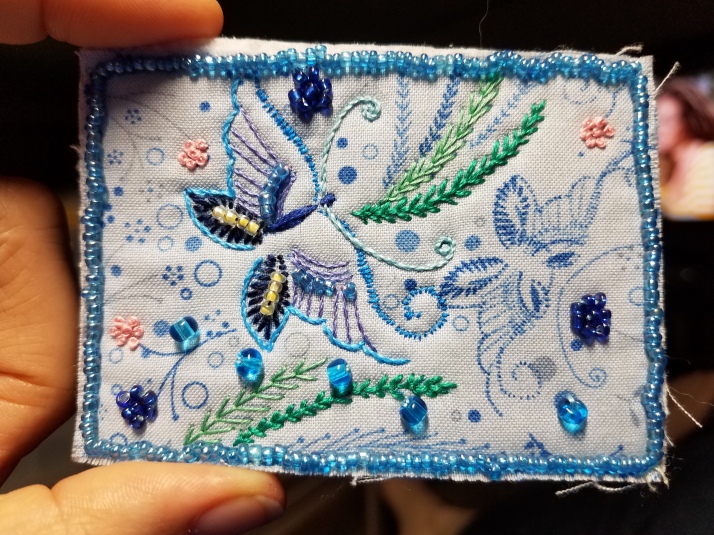
So, I had to stitch it! I did have to change it up a little bit to fit the piece of fabric that I had, hence the circle around the picture. Plus I ended up tweaking the design a little bit along the way.

I used a light blue background that has subtle clouds on it, which are hard to see in the pictures. After choosing my colors, I started working on the stitching. I had picked a range of blues for the outer petals, but quickly realized an issue after I started the first one. The colors were too light and blended with the background. I did some digging in my threads and redid the petal.

Then when I got to the purple petals, I ran into another issue (part of which is most of my purple threads appear to be lost in a tote somewhere…). The one thread I picked out which I thought would blend, didn’t. So I had to carefully rip it out and add in another purple.

This particular needlepainted project seemed to fly by and I finished it up rather quickly, then found a nice frame for it.

Once it was completely finished, I did a porch drop at my friend’s house. Surprise! 🙂

The original design may still end up as a tattoo somewhere on my body some day. We shall see.

Needlepainted Teal Rose

100 hours of hand stitching, one thread at a time, to create this Teal Rose that now hangs in my mom’s sewing hangout. The rose itself measures about 7″ in diameter.

IMG_20200723_161647

This rose came about after a friend posted a picture of a beautiful “perfect rose” from her garden.

perfectrose1

(photo credit V.L. 2020)

I saw the picture, downloaded it, and played around in a photo editor with inverting the color.

IMG_20200630_025655_060 (1)

I received permission from her to use it in an embroidery design. I had to make the photo black and white, print it out, then trace it to get the lines of the individual petals. I realized once I got ready to stitch that I missed a petal in the tracing and had to go back and add it. Oops! You can see that I have the petals numbered. This gives me a rough idea of which ones are stitched first. All the 1’s, then the 2’s, etc.  The numbering may change as I work inward as I may realize something overlaps different than I thought.

Once I had the drawing made, I had to then transfer it to fabric and stitch the outline. I decided to stitch the rose in teals because I absolutely LOVE how the inverted picture of the rose looks in teal.

I used 9 different threads in teals and very pale blue-teal in order to create this rose.

Needlepainting by hand involves taking one single thread at a time and stitching one petal or section at a time, moving from background to foreground. The stitches used are long and short stitches.  You need to look at the way the petals/sections lie, the direction of them, and think about light vs dark.  I could do this same design in other colors and the shading could turn out completely different based on where I put the lights and darks.  I could shade it as if the sun is shining from at angle and have one side darker than the other.

As you can see in the below pictures, I started from the outside and worked in, because the outside petals are “behind” the front/inner petals.  This is not always the case, so you have to study your design and pick out what would be the background. Stitching the petals like this help give the layered look and help the individual petals stand out more. It would suck to get all the way done and just have a teal blob as an end result.

If you love embroidery but haven’t tried needlepainting before, try it! Check out Trish Burr’s books and videos.  I started with her books and designs, then kind of adapted it a little to fit my style and started finding my own designs to use. Or I use photographs that I’ve taken or friends have taken and turned them into designs.

The possibilities are almost endless. If it can be drawn, it can probably be needlepainted. Although you may have to make minor adjustments to get ‘sections’ to stitch. In the above pictures you can see that the center of the rose originally was a larger piece that I later broke up into smaller sections to make it easier to stitch.

Princing Project

Recently, a group of us started talking about doing a project where we all used the same quilt pattern or type of quilt block to make quilts, using the fabrics we already had at home.  We decided to go with Log Cabin blocks because there is a lot of variety out there with Log Cabin blocks. Traditional, Wonky, Curved, Half or Quarter Log Cabin, etc.  We named it Princing Project after a good friend of ours who makes some of the most beautiful quilts from scraps. And from fabrics that you would never think could go together.

I decided to go with Quarter Log Cabin blocks for mine, all scrappy.

IMG_20200410_005712

And then, of course, I had to play around with layout ideas once I had enough blocks made up.

I’m not completely finished yet with the quilt top. I still need to add one more side to it to make it wider, but it’s definitely…bright.  I made some smaller Quarter Log blocks and put them together to make the center block.  It’s so busy and bright though, that it’s hard to really tell.

IMG_20200518_161131 (2)

Very loud, very bright, very colorful.  And all made with scraps!


Oops

Well, it’s been almost two years since my last post.  I really didn’t plan to be gone this long.  I got a bit tangled up in yarn, thread, and more.  Plus, I started going back to school. Yes, I decided to be crazy again. This time I’m going for a degree in Computers/Information Technology.  I’ve wobbled a little bit on exactly which path I want to take with it, programming, networking, general tech, and web design.  So far, I liked programming, but I’m loving web design.  I’m still in the first class for that though, so we’ll see how next semester looks.

I’m still experimenting with dinner recipes and some desserts, still quilting, doing embroidery, burning wood, and painting. I haven’t done as much crocheting in the past couple years though.

One of my last posts introduced our latest rescue kitty, a very frail and emaciated black kitten. She is still with us!  We named her Jayne Dough and she is no longer a sickly and thin kitten. She kind of plumped out.  A lot.  We’ve also nicknamed her Turtle, because she rolls over onto her back and then she can’t get back up.  She has a spinal nerve injury, so she’s limited in her movements. But she’s an absolute sweetheart and even Pixie, the cat that hates cats, tolerates her.

I will try not to be gone as long this time, but we’ll see how the next semester of work and school eats up my time.  Signed up for three classes, plus whatever classes my own students end up taking.

Keep stitching!

Shell

Recipe: Baked Chicken and Zucchini

Disclaimer: I’m bad about timing each step. I cook by how things look and smell at different steps more than anything else. And I rarely measure out seasonings and such. I’ll try to get close though!

My mother-in-law gave us some zucchini and tomatoes from her garden recently. Her garden has been going crazy producing veggies and we’ve benefited from it as well.

I only had one chicken breast to work with, so yours will probably look fuller in the pan.

Ingredients:

2 chicken breasts, cut into large pieces

1 tbsp olive oil

4-5 tomatoes (I used Roma)

2 medium sized zucchini

Bag of steamable broccoli

1-2 Garlic clove

Seasonings (to your taste buds preference):

Black pepper

Poultry seasoning

Onion powder

Turmeric

Slice your zucchini into rounds and dice your tomatoes.

Season your chicken with black pepper, poultry seasoning, onion powder, turmeric. Heat up the olive oil (I used medium heat), add in the garlic and chicken, then brown the chicken on both sides. I think I did 5 minutes per side.

Take the chicken out of the pan and set the chicken into a glass baking dish (I used 9×13 pan). Start the oven preheating to 325.

In the pan on the stove that you used to brown the chicken, add your zucchini. You should still have hot olive oil in the pan so be careful. Couple minutes per side, or until zucchini slices start to soften. (At this point I had steamed the bag of broccoli, but I would recommend only doing half the time the bag calls for. I did end up with soggy broccoli at the end).

Add your tomatoes to the pan. Let them cook a couple minutes together.

While the tomatoes and zucchini were cooking I dumped the steamed broccoli into the glass baking dish with the chicken.

Then I added the zucchini and tomato mix on top. Then put it in the oven. The dish baked at 325 for approx 25 minutes.

Then we ate!

Changes I would do next time: add more chicken. Season a little heavier. Remember the garlic. Less steaming on the broccoli before baking. Cook the zucchini a little longer on stovetop before adding to the dish. Maybe add some cauliflower rice.

Cat Magnets

Not actual stick on the fridge kind, but the kind where you yourself are a cat magnet. I’m thinking my husband and I are. 4 years ago we had Ginger fall into our laps as a semi-friendly feral that needed a home.

2 years ago Molly showed up, a tiny 3 week old kitten that needed to be bottle fed. She has now grown up to be super friendly and earns her nickname of Monster Molly. She has no fear and is very stubborn.

Our other two cats are also rescues of sorts. Penny is eight and a half and my cousin found her when she was only a couple months old. Then we adopted her from my cousin.

Pixie actually came from a rescue shelter. We got her at about 8 weeks old and have had her seven years now.

And that brings us to this week. Monday I got a text from the neighbor asking where I was. She found a very emaciated kitten and wanted to know what to do with it. She didn’t want to just leave it out to the elements. We brought her to our house and set up our breezeway as the foster cat area… Again.

She is about 6 months old, maybe a little older, according to the vet. Extremely friendly. Now that she has had several days of food and water and shelter she is moving around really well and being affectionate. She is still very skinny but walking tall now instead of barely moving.

It’s actually very hard to get a picture of her now because she’s constantly exploring and moving around. We have two potential homes lined up for her. All contingent on if we find her owners or not.

We definitely are cat magnets. Are you?

Where Have I Been?

Or rather, what have I been doing?

I’ve been up to my elbows in acrylic paints! Only unlike the painting in my last post where I was attempting a design, I have been learning the art of acrylic pouring.

It’s more than just dump paint on a canvas and tilt it, which a lot of people think that’s all there is to it. I’m still learning, so I’m not an expert by any means, but I can share what I’ve learned so far.

This was my very first one. I had old tube acrylic paints and a vague idea of what pouring medium was for. I did puddle pours as that’s all I knew about at the time.

Lessons from this one:

1) wear gloves.

2) mix enough paint that it will also cover the sides.

3) don’t use old paints.

After that I picked up some new paints, but cheap ones as I’m in the practice and learn stages. Although pouring medium is not cheap. Get it on sale! (I’m using CraftSmart paints and Liquitex pouring medium).

This was my second one. I did puddle pours again.

Lesson: after pouring the puddles, don’t forget to do a little swish through the puddles with a stir stick. Otherwise you get blob areas like I did here. But don’t stir too much either or you get mud.

After that I started experimenting with dirty cup pours, multiple puddles on one canvas, flip cups, and dragging a toothpick through the paint. And got better at making sure I got the sides covered.

Lessons:

1) different paint colors need different amounts of pouring medium. Experiment with it.

2) some colors work excellent together and some turn to mud colors.

3) as you tilt the canvas you can use one hand to catch paint and kind of slide it down the edge of the canvas to help draw paint to the edges and over.

4) glitter paints are a hit and miss paint. Sometimes the glitter will pop like crazy, other times you’re scratching your head (hopefully without paint drenched gloves on still) wondering if you really did add glitter paint or not.

5) Enjoy. Have fun. Experiment.

6) you might not like the end result, but someone else might fall in love with it. Don’t immediately decide it’s a failure. (Unless it’s a canvas of mud. Then it might be!)

Lots of pictures incoming!

I’m loving this art!

Playing Around

I decided to take a sewing break after the big push to get all those bags done. So I’ve been dabbling with a few other hobbies the past couple weeks.

One hobby, which I’d actually love to take classes on to learn the correct techniques, is painting. But for now I just have fun with it. I created a little 12×12 canvas painting for our living room:

I took random items from around my Wife Cave to get the various circle sizes.

I’m also working on transforming an old wooden tray that I bought years ago into a craft tray. So far I have a few base coats of paint on it but haven’t decided on design yet.

In the center section I’m going to glue some fabric pin cushion balls that I made.

I’ve also worked a little on my latest embroidery rose (which I don’t appear to have a picture of), some artist trading cards, a few fun drawings, and a Zentangle drawing:

What have you been up to lately? Try anything new?

Note: if want to comment here but are unable to, you can find me on Facebook, Little Orphan Stitch, and comment or message me there to let me know.

Bags, Bags, and More Bags

Well, I have been working hard at making bags, pouches, and more for the past couple months getting ready for a craft show at Michigan BuskerFest. It is this Saturday, and I think I’m at the point where I feel ready.

A pile of bags:

K.I.S. bags:

Medium vinyl pouches:

Wallet style vinyl pouches:

Business/ credit card size pouches:

Coin/earbud pouches:

And the newest in the line up, dispenser bags for carrying waste bags for dog walking. They are also great for parents. Why? Well, ever been in a restaurant with your little one and they have that dreaded diaper explosion…all over? Have a dispenser bag with you and you can bag up the clothes to contain the mess.

Wish us luck!

Free Motion aka “drop the dogs and go”

About a month ago my mom taught me how to free motion quilt. She always says, “just drop the dogs and go”. Unfortunately, at the time it was shortly after the thumb versus rotary cutter incident, so I wasn’t able to do much.

I’m mostly healed now, it all reattached, although I do have decreased sensation and pain around the scarring. It’s only been 4 1/2 weeks though, so I’m pretty happy.

Anyway, back to free motion. You know what? Its fun! Drop the feed dogs, put on the correct foot, and get a good grip on the piece you’re working on.

Those above are a few of the ones I’ve done in the past couple nights. And a few more from tonight:

Tips from me:

  • Have a good grip with both hands on your fabric
  • Steady, fast speed with the foot pedal and consistent speed with your hands
  • Remember stitch length is determined by how fast you move the fabric with your hands. No feed dogs!
  • Have fun and don’t worry about it.

I hope you get a chance to try it out if you haven’t tried it before. And if you tried it and didn’t like it, just try it out again and remember… have fun and don’t worry! It’s not supposed to look perfect